21 July 2014

Anoher Return

Hey internet, I bet you missed me!

A lot of crazy chaos named school and life kidnapped me, but I'm back now with all sorts of projects and junk no one ever reads! But it feels good I guess to have a place to shove all your work just in case. 

Coming back I notice a lot of terrible things on this blog, first some posts aren't readable at all, sorry for that. Second, some pictures have poofed off the face of the earth (well, internet eart) - double sorry for that! Since my summer is coming to an end I don't think I'll have time to fix them, but maybe over winter holiday! 

26 June 2012

What a Waste!


Anyone know what “waste canvas” is? I sure didn’t, but I saw it at the fabric store and decided to experiment with it and so it sat, under a pile of fabric… for two years… The nice thing is that you can baste this disposable fabric onto another, prettier or more versatile fabric and embroider away on something a little more interesting than the standard Aida fabric.


Finally, I’ve gotten around to doing something with it… 


Would you like to see the process? 

What you will need:
  • waste canvas 
  • "background" fabric
  • pattern
  • water soluble marker/pencils/well controlled drops of blood
  • seam gauge
  • pattern requirements (floss, scissors, teeth, beads etc.)
  • patience
  • good eyes/magnifying glass/slaves 
The nice thing is that you can baste this disposable fabric onto another, prettier or more versatile fabric and embroider away on something a little more interesting than the standard Aida fabric. The downside is that there are what looks to be twice as many holes as there are on standard Aida. Since the fibres are meant to be pulled apart, this is a stiff fabric with an open weave. 

Got all your stuff? Ready okay. Go
1. BASTE your waste to the RIGHT side of your “background” fabric. I’m so used to working with interfacings that I must admit, this is a weird feeling for me…


See all those holes? I don't know about you, but this was a challenge for me to get used to

Take your marking device, lay out your grid and start stitching away – remember, light to dark…
Got everything lovely and filled? Great! Time to unravel and unwind…

Start at your corners and pull until you hit the design area…
Once you start pulling fibres from the design, pull S L O W L Y and scrunch as you go (like you’re trying to ruffle the pattern) to make sure you don’t snap the waste threads.

WARNING: this is a slow and yes, painful process if you have a lot of covered area like I do. You will have to pull one thread at a time, move SLOW and be prepared to have aching, scratched up fingers. You may get something akin to rug burn on the sides of your fingers (and I am NOT kidding about this – it stings)
Don't feel too bad - the fibres are fighting back but in the end, they will be reduced to a mere tumble weed of angry and sad...

No pain, no gain, and when you’re done you’re left with your pretty image on a fitting backdrop. Now, just… add some details…
And you’re done!

 Now you just have to find something to do with it...

24 February 2011

Loom-Knit Cable Stitch Leg Warmers

Making cables with your knitting loom can be fun and gratifying. It also makes you feel like you've really knitted something special! However, it's no easy task. It's really easy to make your working threads too tight and have them snap on you when you're making you piece. I highly recommend that you make a mock up of every new yarn you use when you set out to make a cabled piece. Every gauge and fiber has its own strength and elasticity. It's better to know the limits of your yarn before you've put time into the actual garment.

 
What you'll need:
  • 1 red (round) 31 peg knifty knitter
  • Black/dark sharpie
  • Aprox. 6oz gauge 5 (bulky) yarn
  • Nifty knitter loom tool
  • Crochet hook (for crochet cast on – optional)
  • Stitch holder
  • Yarn needle
  • Scissors
  • Measuring tape
  • Piece of paper to keep track of where you are in the pattern
     
Stitch Key:
  • E-wrap – the basic loop-a-loop cast on for your loom
  • P – purl stitch
  • K – knit stitch
  • C – cable work
     
How to:
  1. Measure the length or the leg that requires a warmer – write that down
     
  2. Take your red round knifty knitter, get your sharpie and number all your pegs (if you've never done this before, you should, it really helps. If you're worried that you'll permanently disfigure your loom, you won't – the sharpie wears off eventually – usually within one project).

  3. Cast on all 31 pegs using either the e-wrap or crochet cast on method.
*NOTE* we're now going to make one of the end borders. This is a garter stitch
border. You may knit any border you like, but keep in mind a few things, a) this stitch makes a fabric that may roll a little bit, b) if you choose a different border you might want to make a simple one since the cable work will command a lot of attention. FYI, this IS the border I used in my original,

  1. Garter stitch border:
    Row 1: purl
    Row 2: knit
    Row 3: purl
    Row 4: knit
    *row means to P or K all the way around your loom – all 31 stitches will be purled or knitted*
You may extend this a few more rows if you'd like – measure and write down the length of the border. Assume that the bottom border will be this same length. Double the number you just wrote down and subtract if from the leg length. The resulting number is the length of cable pattern you will have to knit.
  1. Pattern work:

    Row 5 – 9: (beginning at peg 1) P3, K6 – repeat until peg 30; K peg31
        Should be: PPP KKKKKK PPP KKKKKK PPP KKKKKK PPP K

     
    Cable prep: (this starts row 10)
  • P peg 1 -3
  • e-wrap peg 4 once; 5, 6, 7, 8 twice; 9 once
    (pegs 5-8 have 3 loops, 4 + 9 have 2)
    *note*
    keep your loops loose! This is an art in itself. If you make the loops too tight you will not be able to cross your threads over and if you try, they'll snap! If, however, you make the wraps too lose, your cables will be droopy (although it seems to be hard to make the wraps too lose).
  • P next 3
  • Knit the last (bottom) loop over all other loops on pegs 4 -9. When this is done peg 4 + 9 will have 1 loop left, pegs 5 – 8 should have 2
  • Grab your stitch holder; take the loops from peg 6, 5 and 4 (elongating the threads where possible) and place them on your stitch holder. Let this fall to the back of your work.
  • Take the loop from peg 7, elongate it to place it onto peg 4
  • Take loop from 8 and place onto 5
  • Take loop from 9 and place onto 6
  • Now, take the stitches from your stitch holder and place the loop from 6 onto peg 9; the loop from peg 5 onto 8; and lastly the loop from 4 onto 7.
So, how'd it go? Were your loops too tight? Too lose? Take your time, do not force any loop onto a peg! If it is too short, it is too short. This is why I urge you to practice! If you force a loop onto a peg you could hurt yourself, break your loom, or snap your yarn! None of those options are optimal!!
If you're confidant in your loops, please continue on. . .
  1. Repeat cable prep until peg 30. Your loom should be as follows
    PPP CCCCCC PPP CCCCCC PPP CCCCCC PPP
    Knit peg 31

  2. Row 11: PPP KKKKKK PPP KKKKKK PPP KKKKKK PPP K (knit all former cable stitches)

  3.  Repeat steps 5 – 7 until cable work is the length calculated in step 4
     
  4. Repeat step 4 to make last garter stitch border. Remove with removal method of choice. 
    This is what a page of my knit book for this project would look like. this helps (me) to make sure I've made all the necessary stitches and also helps me to remember how large of an area I'm to knit. 

     
There! You now have a leg warmer! Might I suggest making another?
Questions? Please let me know, I'll try to help.


18 October 2010

Black Mage Hat

Anthony's hat for his black mage costumes is done! Very exciting. I was a little nervous about making this hat, but in the end it turned out well, I think.


Clearly, that's not him, but I'll get a pick of him in the hat yet!


The hat only took an hour to draft, cut and sew. In addition to being a breeze to make, you only need about a yard of 72" felt to make it (I got lucky and found a remnant at Jo Ann's – 50% off!), so this is super cheap too (especially because around this time they put all the felt on sale for about $2ish/yd).

Anyone interested in a tutorial?

14 October 2010

Wark!

.
               ___/),.._
             /'   ,.   ."'._
            (     "'   '-.__"-._             ,-
             \'='='),  3\ -._-"-.          -"/
                   / ""/"\,_\,__""       _" /,-
                  /   /                -" _/"/
                 /   |    ._\\ |\  |_.".-"  /
                /    |   __\)|)|),/|_." _,."
               7     \_."   " ") | ).-""---''--
              (                  "/.""7__-""''
              |                   3 ."._--._
              \       \ (_    __   ""   ".,_
               \.,.    \  ""   -"".-"
                ".,_,  (",_-,,,-".-
                    "'-,\_   __,-"
                          ",)" ")
                           /"\-"
                         ,"\/
                   _,.__/"\/_
             ctr  / \) "./,  ".
               --/---"---" "-) )----

12 October 2010

Ichiroya Review

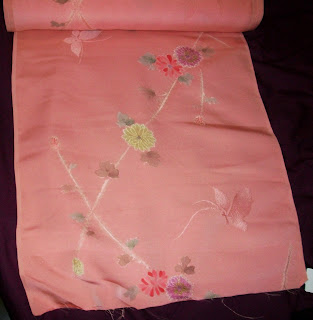
    The fabric is here! So, as promised, here is my review of ichiroya.com.
Overall Rating (5 max): ✯✯✯✯✯ 
Order Placed: 29 September 2010     Order Received: 12 Oct. 2010

Fabric: silk

SizeWidth: 14.5"
  Length: 472.5"
Technique: dyed and woven

History: quite new

Condition: excellent

Price$78.00 $38.00


Fabric as pictured on website:

Fabric as arrived:


Good: Ichiroya.com has a great selection of Japanese kimono fabrics of various fiber content, age, condition and price range. They accepted my payment promptly and my fabric arrived in less than 2 weeks. Their pricing seems fair, as does the shipping charges. The fabric was as pictured and as described on the internet. I didn't have to contact the company so I can't report on their promptness in this area.

Bad: There are way too many choices on this site! 

Overall: I would defiantly shop from this site again!

05 October 2010

Halloween Costumes!


    Anthony and I were invited to a Halloween party. After much thinking, we've decided to be a version of a white and black mage from the Final Fantasy series. Naturally, I adapted the white mage's outfit from FF III to be more Loli-like, here's my idea:
    I don't know yet how Anthony's is going to look, all he's told me is that he wants "the hat", cape, and pants. . . it's a start.

Template by:
Free Blog Templates