24 September 2010

I made you a cookie!


I know - I haven't been around for AGES. Will it make you feel better if I tell you how to turn cake mix into cookies?

What you need:

  • 1 box of cake mix (any flavour you'd like)
  • ½ cup of fat – this can be any kind of oil, slightly melted butter or margarine
  • 2 large eggs
  • 1 tsp of vanilla extract
  • Chocolate chips and/or nuts (optional)


How to make your cake into a cookie:

  1. Preheat oven to 350°
  2. Put your oil/butter into a bowl. Add eggs and whip together. Add vanilla, whip one last time (I used an electric blender, but it's not necessary)
  3. Empty contents of cake mix into your wet ingredients. Stir until all the cake mix is incorporated.
  4. Add nuts and/or chips
  5. Grease / cookie-proof your bake sheet
  6. Drop cookies mix by rounded spoonful onto sheet.
  7. Bake for 10 – 14 min – or until cookies are a light golden brown. Do not over bake, they'll get really hard and crumbly. 
  8.  


Cake mixes make great impromptu cookies. Most grocery stores run killer sales on mixes (I got 5 for $5) so they're an affordable thing to keep on hand so that you could whip up tasty treats on short notice, or on a hunger whim. This trick is also a good project for kids and there are a lot of ways you can have fun and mix it up:


Instead of butter or oil for fat try ½ c of:

  • Applesauce
  • Purred banana
  • Pureed pumpkin


Try adding seasonal spices to your mix like pumpkin pie spice


Add some dried fruit or oatmeal to your cookies for a yummy trail mix treat,


Get creative and have fun!

10 August 2010

Moving on


    The corset is done! Has eyelets and all! Here I am in all its glory. 


    The next thing to do is to make a dress to go over top – can't walk around the faire naked! (although my boyfriend insists the chemise and corset is far too many clothes already)
    To make a dress that fits properly, you've got to have your dress double set up right. Put on all your underpinnings and take your measurements. Next, deck your double out in all your underpinnings. Because the dummy can't squish like me, I set her up to have my corset measurements and tie the corset on as well as I can. Now measure her and make sure she matches up with your own.
I've begun with the muslin of the bodice. Cut out your pattern – I always cut a size too big. It'd rather resize with too much than too little. Take your creation and pin it on the double. Take your pins and fit that bodice!
If you've cut a pattern too large, you will have alterations to make.
Woah! too big!
Those pins make a tailored torso!
The blue line means, "Cut here so you can more your arms!"
After everything is cut to size and seam allowances added,
The needed seams in dashes
Connect the dots!
Cut on the blue one!
Ah, perfection!
  I make a copy in pattern ease. It holds up better than paper or tissue. I intend to use this pattern again and don't really want to have to fit it every time x_x. I'm going to turn this muslin into a flatline for the actual outer fabric so that the satin has a nicer body.

Bound Eyelet – Type 1


Let's bind some eyelets! This is one way I know; maybe you'd like to try? I took lots of pictures so I hope they help and give you confidence to try this yourself.
Before the how to, let's think – why would you chose to bind an eyelet rather than apply a grommet? First of all, it's period (period meaning it's what they would have used before 1830). In addition to being historically accurate, they're easier to apply that the metal grommets if you like upper body strength like I do, you don't have to worry out them popping out, and you don't need specialized tools.
Alright, the how to:
Materials:
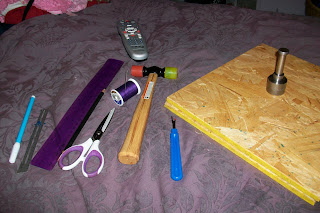
Seam gauge: needed to you can space the holes accurately
Dressmaker's pen or pencil: to make out the eyelets
Needle: to help you pull the thread through the fabric, of course – choose one in a heavy gauge if your corset has a substantial interlining!
Thread: choose one that is STRONG! Try upholstery thread, some hand quilting threads, or machine embroidery threads. Remember that lacings are going through those eyelets and rubbing over your stitching. Pick a thread that can withstand it.
Awl, sharpened stick (really, no joke)/pencil: to make the holes. Something pointy like those will stretch the fabric and prevent ravelling. You can also use scissors or that weird hole punch thing that you buy at Jo Ann's to set grommets, but remember that once you cut into the fabric, it becomes weaker.
Ruler: lets you make sure the eyelets are in a straight line.

 
NOTE: These instructions are being written referring to your corset. If this is your first time trying this method, please try it out on scrap fabrics! Everyone needs to practice skills before they go to their corset >_<.

 
Steps:

  1. Find your eyelet channel. Take the ruler and with your dressmaker's pen draw a line from top to bottom of the corset right down the middle. This will let you set your eyelets in a nice strait line.

  2. Decide how your eyelets will be spaced. Take your seam gauge and dressmaker's pen and plot out where your eyelets will be.

  3. Take your pointy implement or scissors or punch, and make the eyelet holes. It may seem scary at first if this is your first time making a corset, but don't worry – you need to do this! If you're using a sharpened skewer or pencil to make your holes, please be very careful and mind your fingers!! Last thing you need is blood all over your pretty corset!


  4. Holes all in? Good. Grab your thread and needle and cut a very long piece of thread. Then match cut end to cut end of thread and put both cut ends through the needle. Tie all cut ends to the loop side so that you're sewing with 4 threads instead of one or two.

  5. Ready now? Take a deep breath and let's go: insert the needle into the back side of the corset and pull through to the front. Put the needle through the hole. Insert the needle through the threads just under the knot and pull to secure,

  6. Push the needle through to the front near your first stitch. Pull thread through all the way, pulling tight.

  7. Put the needle through the hole, push through back half way.

  8. Wrap the thread behind the needle. Pull needle though front of corset.
    Take a stitch over the stitch you just made to secure "L" shape.

  9. Insert the needle close to your last stitch from the back and repeat. Keep on and it will look like this:


    To finish the eyelet, continue doing what have been doing to make those "L" shapes. When you make your last securing stitch, tie off the threads on the underside of the corset.

 
I hope this tutorial helps you. If you have any questions please ask. Remember to try this method and perfect it before you actually implement it on your actual corset. 

05 August 2010

Bound to You


    My corset is finally bound! I took the easy way out, I think. I did it with my machine in a rather haphazard way. I don't really recommend this technique. In hindsight, as I say with every corset, it probably would have been easier and prettier to do it all by hand. Maybe, as I also find myself saying with every corset I make for myself, I'll rework the binding by hand one day. I'd worry about it more if it was for someone else, but it's only for my use and I'll really be the only one seeing it, so I suppose it will do.
    Now I'm up to making eyelets. Up to this point I've only inset metal ones. This time, however, I have decided to bind them by hand. I've also decided to make the eyelets in a pattern to accommodate spiral lacing. So far - so good. Although it is very time consuming, I think the effort will be worth it. I think I'll post a tutorial for you all to see how to make a bound eyelet – or, how I bind them. . . for real this time, I swear!

04 August 2010

Hell Dress


    Alright! Finally, I have completed the dress. Here it is on my dummy. Hopefully I'll con someone into taking some nice pictures soon.


Back
    I've christened this dress the "Hell Dress" – why? Well, the original zipper shredded after I put it in, yes shredded! Then my serger went weird and I went through 3 needles! Crazy. Also, during the whole process I had the worse cramps! So, while being under the weather and frustrated, I failed to document this process well. I'm sorry. I'll try to do better on the next project.
    During this time, my bones came (yay!) and I have since put them into their proper channels. So now I will be working on finishing the corset and then I can, finally, move onto making my gown!

28 July 2010

Sketchy Business


who needs a face, arms or legs?
   My sketch is done!

Let's see how close I can get. I think I'll pull a Frankenstein and splice different patterns together to get the desired look. I'm just bored enough, so I might do a good job documenting this.

Idle Hands. . .


    I'm bored. . . no bones, no work today, no Otakon to get ready for – what a bummer! I found this fabric in my stash. It's cute. I was going to make a petticoat out of it for a client, but she reneged and luckily I hadn't cut into it yet. I estimate I have about 3 ½ yds. I am soo yearning for Otakon – the cosplay, the pictures, the people, the anime, the wandering around in Baltimore all dressed up and getting odd reactions, the good time with friends – why oh why must I be poor?!?! Damned economy >:[ I'm digressing here, sorry. Okay, pining for Otakon, have 3 ½ ish yards of Lolita-like fabric. . . so why not make a pretty summery Loli dress?
    Now, a lot of Lolita dresses can be over the top, and don't get me wrong – I love over the top, I thrive on over the top, but I want something the boyfriend will let me out of the house in! So, let's plan this thing.
What I want in the dress:


  • Summer appropriate


    • the print dictates this


    • no sleeves or cap sleeves


  • knee length skirt


  • full skirt – I have some crinoline if needed


  • nothing too "crazy"   

    I don't want to spend too much. I haven't worked all week and school will be starting in a month. I'd like to spend no more than a few dollars on a zipper or smocked fabric so that I can, you know get in and out of the completed garment.
  The print is a little busy. Do I want an entire dress dedicated to this print?

 
Yay! Options!
There's no way for you to know this, but there was a 15 min gap between this sentence and the one above. Why? I had a thought as I considered an entire dress made out only of that fabric. In the absence, I dug out 6 yards of red netting and 3 yards of red cotton fabric. Now I have some options! Yes, we love options, don't we?


Alright, let's see some inspirational photos: 


This is a good start. Let's go do some sketching!

Template by:
Free Blog Templates